Instructions for deploying CRYSTAL v1.0 on VPC and setting up access to the website via public IP
February 28, 2025
upd: June 15
Contents:
Project structure:
- MongoDB v8.0.4.
- Express.js v4.21.2.
- React v19.0.0.
- Node.js v24.0.2.
- NPM v11.3.0.
- PM2 v5.4.3.
- Vite v6.1.0.
Virtual machine specifications, hereinafter referred to as VM:
- Guaranteed vCPU share: 30%.
- vCPU: 2.
- RAM: 4 GB.
- SSD: 20 GB.
- OS: Debian 12.
- Web server: Nginx v1.22.1.
Local PC Specifications:
- OS: Windows 11 Pro, hereinafter referred to as Win 11.
- Command line (Windows terminal), hereinafter referred to as terminal.
Before using CRYSTAL v1.0 or its code in a production environment, it is strongly recommended to carefully review the implementation and assess any potential cybersecurity risks.
It is necessary to consistently follow all the points.
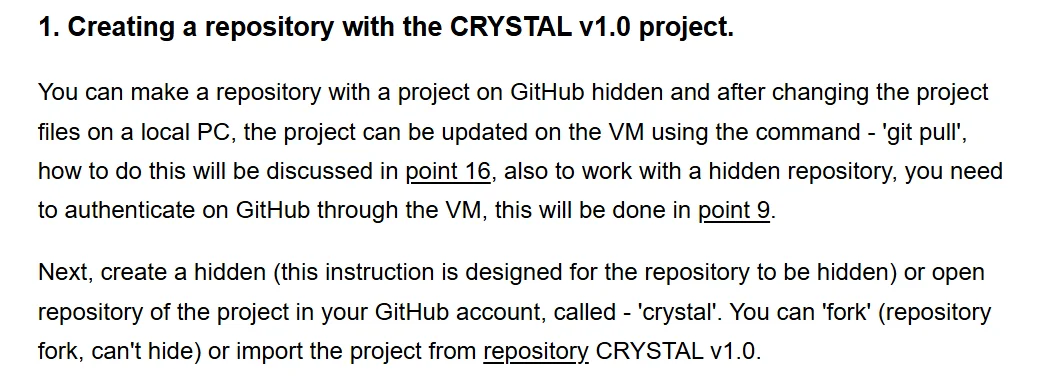
1. Creating a repository with the CRYSTAL v1.0 project
Create a hidden or public project repository in your GitHub account, called 'crystal'. You can 'fork' (fork repository, can't be hidden) or import the project from repository CRYSTAL v1.0.
After changing the project files on the local PC, the project can be updated on the VM using the command - 'git pull', how to do this will be discussed in point 16, also to work with the repository, you need to authenticate on GitHub through the VM, this will be done in point 9.
2. Creating an SSH key
SSH key, needed to connect to the VM from another PC, in this case via the terminal in Win 11. Win 11 comes with a built-in OpenSSH client, which can be used to generate SSH keys.
To create an SSH key, press - 'Win+R' on the keyboard, then enter - 'cmd' in the window that opens and press - 'Enter', the terminal will open, enter the command in it:
ssh-keygen -t ed25519
Next, enter the name of the key:
crystal_key

Screenshot 1
After entering the key, press - 'Enter'.
You will be asked to create a password, this is not mandatory, but it will increase security, since, each time connecting to the VM, you will need to enter the password. The default key location is 'C:\Users\UserName\'. After creating the key, two files will appear, one with the .pub extension (public key) and without the extension (private key), move the files to the address - 'C:\Users\UserName\.ssh\'. In the future, the public key will be added to the VM on the cloud service. Using the private key, a connection to the VM will occur through the terminal in Win 11.
In this instruction, a cloud service is used to create a VM - Cloud.ru, but since all services have the same operating principle, you can use another one.
Next, go to the main page of the service.
3. Creating a security group in VPC
Select the platform - Evolution.
Next, open the menu on the left, and go to the section - 'Security groups', then select - 'Create a security group'.
Fill in the items as in the example below:
Availability zone - ru.AZ-1 (can be any, but the security group and VM must have the same zone availability).
Name - crystal.
Description - can be left blank.
Tags - can be left blank.
Next, you need to open ports 80, 443 and 22 to access the site and VM from the Internet.
Description of ports:
443 - access via HTTPS.
80 - access via HTTP.
22 - to access the VM via the SSH key created earlier.
In the item - 'Incoming traffic rules', click - 'Add rule' and fill in the items as in the example in the screenshot № 2.
Copy the IP below and enter it in the field 'Source':
0.0.0.0/0
In the 'Description' field, enter:
HTTPS IPv4
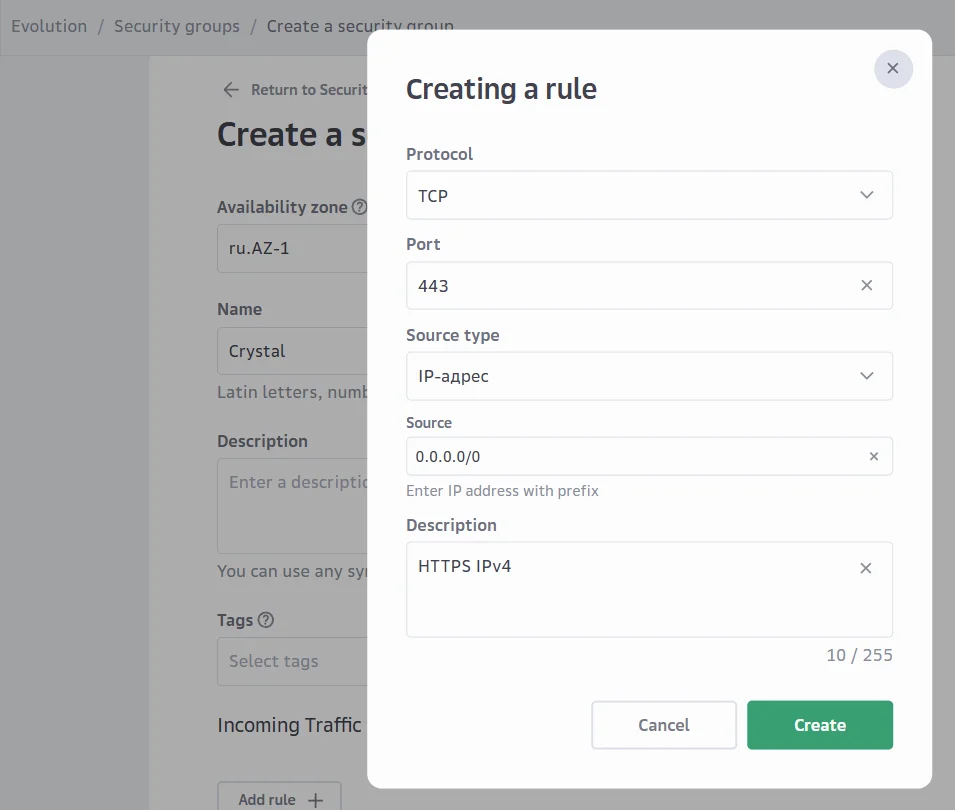
Screenshot 2
After filling in, click the button - 'Create'.
Next, add the rest of the incoming traffic rules. The result should look like in screenshot № 3.
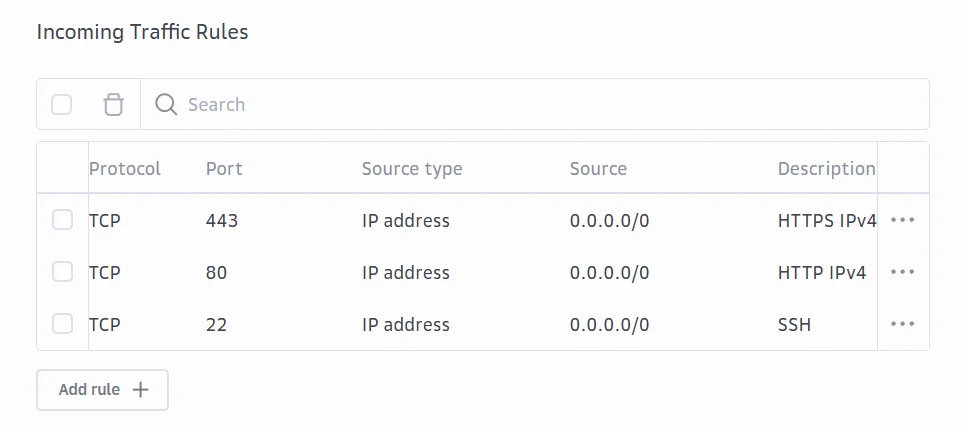
Screenshot 3
Add outgoing traffic rules, as in screenshot № 4.
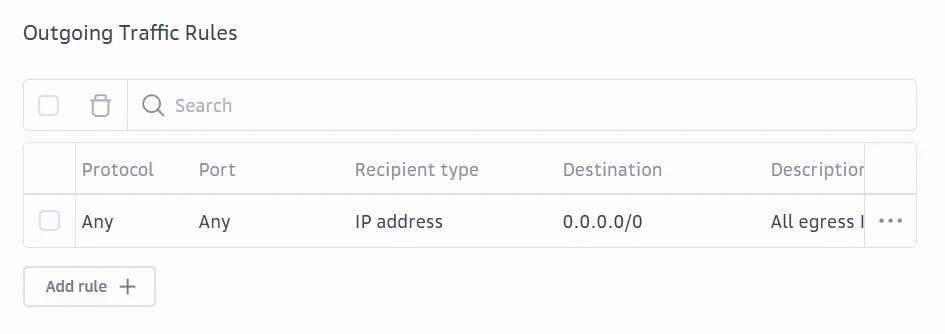
Screenshot 4
Copy to fill the 'Description' field:
All egress IPv4
After adding the outgoing traffic rule, click on the button - 'Create' (security group).
4. Creating a VM
Open the menu, section - 'Virtual machines', and select - 'Create virtual machine'.
Fill in the items as in the example below.
Configuration
Name - crystal.
Description - you can do not fill in.
Tags - can be left blank.
Availability zone - ru.AZ-1 (should be the same as in the previously created security group).
Do not create a placement group.
Image:
Public - Debian 12.
Computing resource:
Guaranteed vCPU share - 30%
vCPU - 2
RAM - 4
Disks:
Boot disk
Name - default
Type - SSD
Size - 20GB
Settings
Network settings
Do not connect to subnet.
Must be checked - 'Connect public IP' (An automatically created, static public IP address will be connected to the VM).
IP type - Direct.
Security groups - select the previously created security group - 'crystal'.
Additional system parameters
Host name - crystal.
User authorization
Login - crystal-vm.
Authentication method
Select - 'Public key'.
You can also specify password for connecting to VM via virtual console - Cloud.ru. The connection will be available only within the Cloud.ru service, and not via the Internet, since by default - 'PasswordAuthentication no'.
Then click - 'Add new key', select - 'Load from file', then go to the directory - 'C:\Users\UserName\.ssh\' and select the previously created public key - 'crystal_key.pub'.
After adding the key file, enter in the field - 'Name', the key name - crystal_key.pub, then click the button - 'Add'.
Then click on the button - 'Create' (VM).
If successful, the VM should be created and after a while, it will be available.
5. Connecting to a VM via terminal in Win 11
You can find the public IP address of your VM in the section - 'Virtual machines', in the column of the same name.
Change the sample text and enter the command in the terminal:
ssh -i C:\Users\UserName\.ssh\crystal_key crystal-vm@VMPublicIPAddress
Example command:
ssh -i C:\Users\Andrew\.ssh\crystal_key crystal-vm@55.55.55.55
After entering the command, press - 'Enter'. If the question - 'Are you sure you want to continue connecting (yes/no/[fingerprint])?' enter - ' yes', then enter the password that you set when creating the SSH key.
6. Installing Node.js, npm and npx
Later, when entering commands, the question - 'Do you want to continue? [Y/n]' may appear, in this case, enter - 'Y', and then press - 'Enter'.
⚠️ Security note
In this manual and in other sections of the documentation, the sudo -i command is used to switch to superuser (root) mode. This is done to speed up the process and reduce commands.
In a production environment, running as root all the time is not recommended, as it violates the principle of least privilege and significantly reduces the security of the
server.
6.1. Enable sudo with the command:
sudo -i
6.2. Update package information and update packages with the command:
apt update && apt -y upgrade
If a window with questions opens during installation, press the - 'Enter' key.
6.3. Install Node.js, npm and npx by sequentially executing the commands below:
apt install curl -y
cd /usr/local/src
curl -O https://nodejs.org/dist/v24.0.2/node-v24.0.2-linux-x64.tar.xz
tar -xf node-v24.0.2-linux-x64.tar.xz
mv node-v24.0.2-linux-x64 /usr/local/node-v24.0.2
ln -sf /usr/local/node-v24.0.2/bin/node /usr/bin/node && ln -sf /usr/local/node-v24.0.2/bin/npm /usr/bin/npm && ln -sf /usr/local/node-v24.0.2/bin/npx /usr/bin/npx
node -v && npm -v && npx -v
echo 'export PATH=/usr/local/node-v24.0.2/bin:$PATH' >> ~/.bashrc
source ~/.bashrc
7. Installing Nginx
Enter command:
apt-get install nginx && nginx -v
If the installation was successful, the console should show the nginx version, for example - 'nginx version: nginx/1.22.1'.
8. Installing git and GitHub
Enter the command:
apt install git && apt install gh
9. Authentication on GitHub via VM
Enter the command:
gh auth login
From the options provided, select - 'GitHub.com', then - 'HTTPS', then - 'Authenticate Git with your GitHub credentials?' - 'Y', then 'Login with a web browser', then press - Enter, there will be an error, since the work is carried out from the console.
Next, copy the link and open it in the browser from which you have already logged into your GitHub account:
https://github.com/login/device
After that, enter the code from the terminal in the window that opens, as in screenshot № 5.
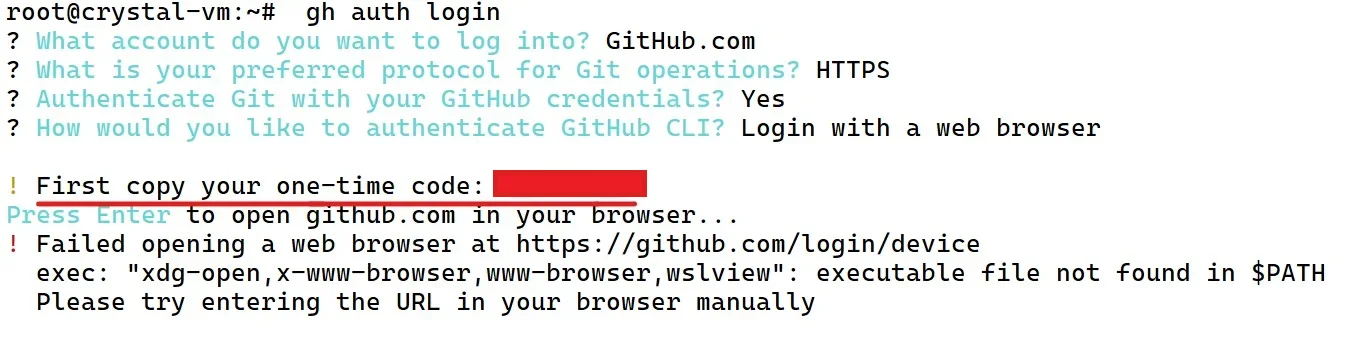
Screenshot 5
Click - 'Authorize github'. If everything goes well, at the end you will see a message like in screenshot № 6.
Screenshot 6
After a while, a message like this should appear in the console - '✓ Authentication complete.'.
10. Cloning a project repository from GitHub to VM
Enter the command and replace the sample text with your GitHub login:
cd /var/www/ && gh repo clone YourLoginGitHub/crystal
11. Configuring ‘sites-available’ and ‘sites-enabled’ in Nginx
11.1. In the 'sites-available' folder at - '/etc/nginx/sites-available', there will be default Nginx server settings, you need to delete these settings and replace them with your own.
In this instruction, the nano text editor will be used. In Debian 12 on the VM, nano is installed by default, check if this editor is installed on your system by entering the command:
nano --version
A message similar to this should appear - 'GNU nano, version 7.2', if it is not there, install nano using the commands that are suitable for your system or use another editor. You can enable mouse control in the editor by pressing - 'alt + m' (the English keyboard layout must be enabled).
Enter the command:
rm /etc/nginx/sites-available/default && nano /etc/nginx/sites-available/crystal
Add the code below to the window that opens. Replace the example text in line 4 with your VM's public IP address:
server {
	listen 80;
	listen [::]:80;
	server_name 'add your VM's public IP address here, without apostrophes';
    # Limit the maximum size of files that can be uploaded via POST requests
	client_max_body_size 3M;
	location /
	{
		root /var/www/crystal/frontend/dist;
		try_files $uri $uri /index.html;
	}
	location /api/
	{
		proxy_pass http://127.0.0.1:3000/;
		proxy_hide_header X-Powered-By;
		proxy_http_version 1.1;
		proxy_set_header Upgrade $http_upgrade;
		proxy_set_header Connection 'upgrade';
		proxy_set_header Host $host;
		proxy_cache_bypass $http_upgrade;
	}
}
After adding the code, press sequentially - 'ctrl + x', 'y', 'Enter'.
11.2. Creating a symbolic link (sites-enabled).
Enter the command:
rm /etc/nginx/sites-enabled/default && ln -s /etc/nginx/sites-available/crystal /etc/nginx/sites-enabled/ && systemctl restart nginx
12. Installing the frontend part of the project and creating the .env.prodIP file
12.1. Creating the .env.prodIP file.
Enter the command:
cd /var/www/crystal/frontend && mkdir env
In the following command, add the public IP address of the VM:
echo VITE_API_BASE_URL=http://PublicIPAddressVM/api > ./env/.env.prodIP
12.2. Assembling the frontend part.
Enter the command:
npm i && npm run build:prod:ip
After successful assembly, enter the public IP address of the VM in the browser address bar, the frontend part of the project should appear there, for example - 'http://PublicIPAddressVM/' (required - 'http', not 'https').
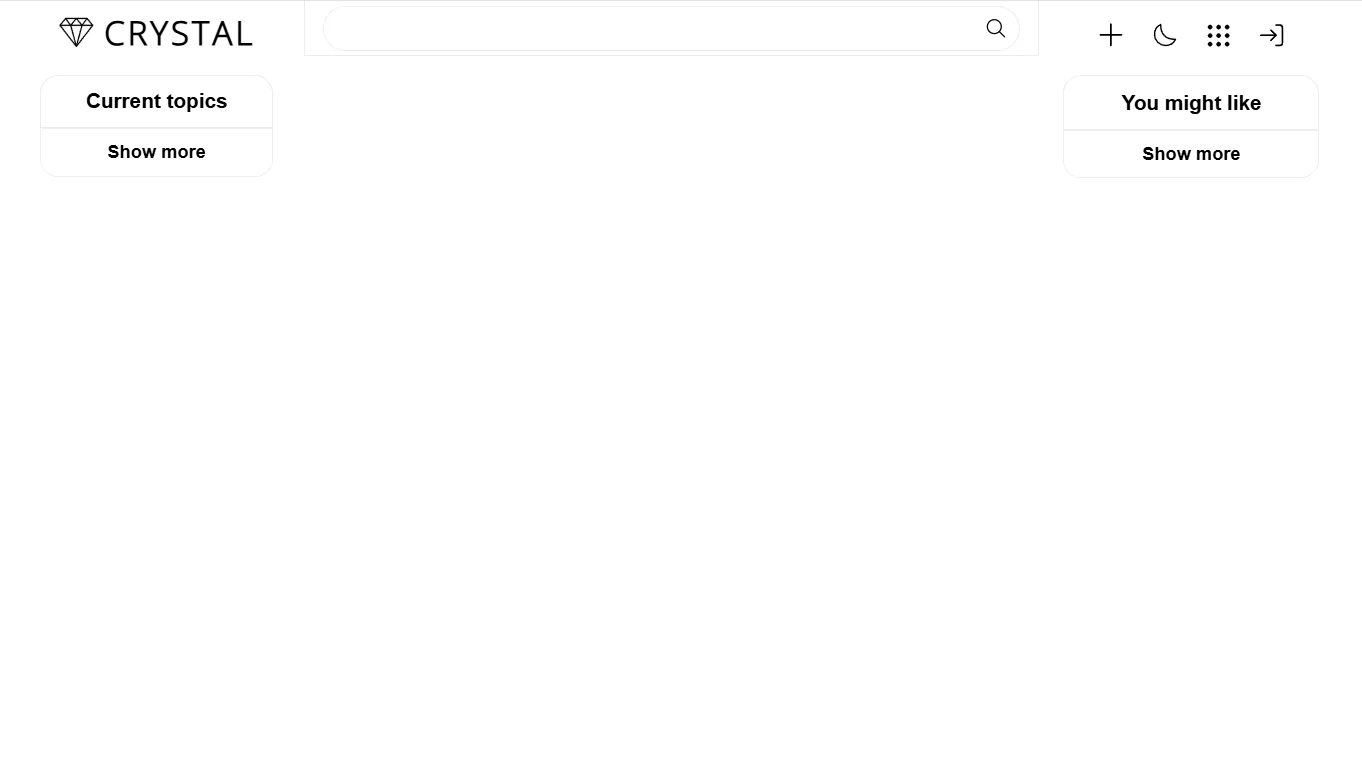
Screenshot 7
13. Installing the backend part of the project and creating the .env and .env.prodIP files
13.1. Creating a .env file.
Next, you need to set the value of the variable - 'JWT_SECRET_KEY'.
To generate the value of the variable - 'JWT_SECRET_KEY', press the key - 'F12' in the Chrome browser (any modern browser will do) and enter the following code in the console:
function generateJWTSecretKey(length = 80) {

const charset = "abcdefghijklmnopqrstuvwxyzABCDEFGHIJKLMNOPQRSTUVWXYZ0123456789!@#$%^&*()_+-=[]{}|:,.<>?";
  const array = new Uint8Array(length);
  window.crypto.getRandomValues(array);
  return Array.from(array)
    .map(b => charset[b % charset.length])
    .join('');
}

const jwtSecretKey = generateJWTSecretKey();

console.log(`JWT_SECRET_KEY="${jwtSecretKey}"`);
The entropy of a key created in this way is approximately 450 to 515 bits.
After entering, you will receive a cryptographically strong - 'JWT_SECRET_KEY'.
Example output in the browser console:
JWT_SECRET_KEY="IW4%ur)Zn5XWqbO[xTYwO&8qi!6<uoi1WZpFTSONl=!cBs5{lA)fV,cgIn}@EP0YSTvnOTsAeIq1A)|X"
Next, enter the command into the terminal:
cd /var/www/crystal/backend && mkdir env && nano ./env/.env
When registering a user with an email, the same as in the variable - 'CREATOR_EMAIL', the administrator mode will be enabled (editing/deleting users and posts).
Enter the data below in the window that opens and replace the sample text with your values:
SERVER_PORT=3000
MONGO_BASE_URI=mongodb://127.0.0.1:27017
MONGO_DB_NAME=crystal
JWT_SECRET_KEY="JWT_secret_key"
CREATOR_EMAIL=email_for_admin_mode
After adding the code, press sequentially - 'ctrl + x', 'y', 'Enter'.
13.2. Creating a .env.prodIP file in the backend part of the project.
Enter the command:
nano ./env/.env.prodIP
Next, enter the data below in the window that opens, and replace the sample text in the variable - 'CORS_ORIGIN', with your public IP address of the VM:
APP_MODE=prod (ip)
CORS_ORIGIN=http://VMPublicIPAddress
After adding the code, press sequentially - 'ctrl + x', 'y', 'Enter'.
13.3. Installing dependencies in the backend part of the project.
Enter the command:
npm i
14. Installing the MongoDB database (MongoDB Community Edition) and connecting it to the project
The actions in this part will be based on the official documentation MongoDB.
14.1. Installing gnupg.
Enter the command:
apt-get install gnupg
14.2. Importing MongoDB GPG Public Key.
Enter the entire command:
curl -fsSL https://www.mongodb.org/static/pgp/server-8.0.asc | \
gpg -o /usr/share/keyrings/mongodb-server-8.0.gpg \
--dearmor
14.3. Creating a list file corresponding to Debian 12.
Enter the entire command:
echo "deb [ signed-by=/usr/share/keyrings/mongodb-server-8.0.gpg ] http://repo.mongodb.org/apt/debian bookworm/mongodb-org/8.0 main" | tee /etc/apt/sources.list.d/mongodb-org-8.0.list
14.4. Reloading the local package database.
Enter the command:
apt-get update
14.5. Installing MongoDB.
Enter the command:
apt-get install -y mongodb-org
14.6. This item is optional, but you can pin the current version of MongoDB, from further updates.
Enter the entire command:
echo "mongodb-org hold" | dpkg --set-selections
echo "mongodb-org-database hold" | dpkg --set-selections
echo "mongodb-org-server hold" | dpkg --set-selections
echo "mongodb-mongosh hold" | dpkg --set-selections
echo "mongodb-org-mongos hold" | dpkg --set-selections
echo "mongodb-org-tools hold" | dpkg --set-selections
14.7. Launch of MongoDB Community Edition
Enter the command:
systemctl start mongod
Let's make sure successful startup by entering the command:
systemctl status mongod
If startup was successful, you should see messages like this:
Loaded: loaded (/lib/systemd/system/mongod.service; disabled; vendor preset: enabled) Active: active (running) since Wed 2025-01-08 15:09:54 UTC; 13s ago
Next, press - 'ctrl + c'.
14.8. To ensure that MongoDB starts after a VM restart, enter the command:
systemctl enable mongod
You can monitor the status of the MongoDB process for errors or important messages by monitoring the output in the file - /var/log/mongodb/mongod.log.
14.9. Mongosh.
Enter the command:
mongosh
This will open a console interface for interacting with the databases, read more about mongosh.
In the opened interface, enter the command:
show dbs
You will see a list of databases that are currently available, the following should appear: 'admin', 'config', 'local';
Then press - 'ctrl + c'.
⚠️ Important: MongoDB security.
In a production environment, you need to enable authorization and create an administrator with a password to close access to the database for outsiders.
MongoDB works without authorization by default, so the port - 27017, can be open to the outside world due to errors in the security settings of the VPC, Docker container, reverse proxy or other infrastructure features.
To ensure the security of the database, read the official MongoDB documentation.
Example of connecting to a secure database, in CRYSTAL v1.0 (Production):
const mongoUri = PRODUCTION_STATUS
? `mongodb://${USER}:${PASSWORD}@${HOST}:${PORT}/${DB_NAME}?authSource=${AUTH_SOURCE}`
: `${BASE_URI}/${DB_NAME}`;
Full code - 'connectDB.js', in CRYSTAL v1.0 (Production).
An example of a simplified version of connecting to a secure database:
const user = encodeURIComponent("AndrewShedov");
const password = encodeURIComponent("password");
const mongoUri = `mongodb://${user}:${password}@127.0.0.1:27017/crystal?authSource=admin`;
mongoose
.connect(mongoUri)
...
15. Running the backend part of the project in the background using PM2
Enter the command:
cd /var/www/crystal/backend && npm install pm2@latest -g && npm run start:prod:ip && pm2 save && pm2 startup && pm2 status
Command description:
Installing PM2 - 'npm install pm2@latest -g'.
Running the file - './src/core/main.js': 'npm run start:prod:ip'.
Saving the PM2 process - 'pm2 save'.
Restarting the PM2 process, after rebooting the VM - 'pm2 startup'.
The PM2 process status is 'pm2 status'.
If the launch is successful, the process named - 'prodIP' should have the status - 'online'.
Open the project in the browser, for example - 'http://VMPublicIPAddress/' (required - 'http', not "https'). Complete the registration and add a post.
In further work with the instruction, GitHub CLI in Win 11 will be used, but you can use other methods (HTTPS, SSH). More about GitHub CLI, installer.
16. Updating the project code on the VM after changing the project on the local PC
Select or create any folder on the local PC, where the project from your repository will be cloned - 'crystal'.
Open a new terminal window and enter the command below:
cd C:\FolderName
Example: cd C:\GIT
Next, clone the repository using the GitHub CLI command:
gh repo clone YourUserNameOnGitHub/crystal
Go to the folder with the project using the command:
cd C:\GIT\crystal
Make any change in the project, for example in the file - 'crystal\frontend\src\app\App.module.css'
After, commit the changes to the repository - 'crystal', on GitHub, with the command:
git add -A & git commit -m "commit" & git push -u origin main
Next, open the window terminal with VM, update the project and build it with the command:
cd /var/www/crystal && git pull && cd /var/www/crystal/frontend && npm run build:prod:ip
Check the changes on the site, through the browser.
In the future, you can improve the project, acting in the following sequence:
Share


Comment on